BIRL: Benchmark on Image Registration methods with Landmark validation
This project/framework is the key component of Automatic Non-rigid Histological Image Registration (ANHIR) challenge hosted at ISBI 2019 conference. The related discussion is hosted on forum.image.sc.
The project contains a set of sample images with related landmark annotations and experimental evaluation of state-of-the-art image registration methods.
The initial dataset of stained histological tissues is composed by image pairs of related sections (mainly, consecutive cuts). Each image in the pair is coloured with a different stain. The registration of those images is a challenging task due to both artefacts and deformations acquired during sample preparation and appearance differences due to staining. For evaluation, we have manually placed landmarks in each image pair. There are at least 40 uniformly spread over the tissue. We do not put any landmarks in the background. For more information about annotation creation and landmarks handling, we refer to the special repository - Dataset: histology landmarks.

The dataset is defined by a CSV file containing paths to target and sensed image and their related landmarks (see ./data-images/pairs-imgs-lnds_mix.csv). With the change of the cover table, the benchmarks can be used for any other image dataset.
Features
List of the main/key features of this package:
- automatic execution of image registration of a sequence of image pairs
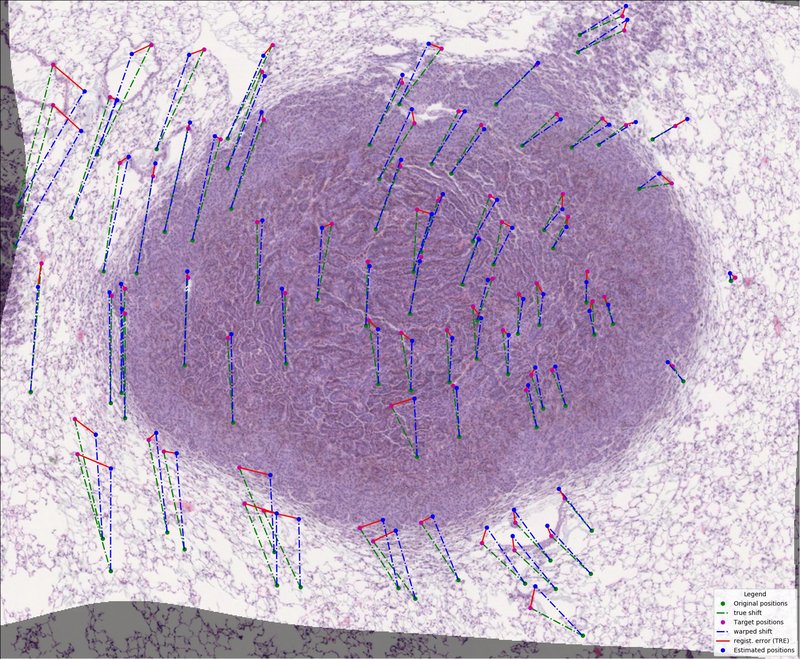
- integrated evaluation of registration performances using Target Registration Error (TRE)
- integrated visualization of performed registration
- running several image registration experiment in parallel
- resuming unfinished sequence of registration benchmark
- handling around dataset and creating own experiments
- using basic image pre-processing - normalizing
- rerun evaluation and visualisation for finished experiments
Structure
The project contains the following folders:
benchmarks- package with benchmark & template and general useful utilsutilities- useful tools and functions
bm_ANHIR- scripts related directly to ANHIR challengebm_dataset- package handling dataset creation and servicingbm_experiments- package with particular benchmark experimentsconfigs- configs for registration methodsdata-images- folder with input sample dataimages- sample image pairs (reference and sensed one)landmarks- related landmarks to images in previous folderlesions_- samples of histology tissue with annotationrat-kidney_- samples of histology tissue with annotation
docs- sphinx documentation and referencesscripts- scripts and macros (ImageJ/Python/Rscript) for registration and work aroundtests- package testing and test requirements
Installation
This package can be simply install using pip running
pip install https://github.com/Borda/BIRL/archive/master.zip
or via setuptools running from a local folder
python setup.py install
For installing some particular version/releases use following links https://github.com/Borda/BIRL/archive/v0.2.3.zip where the numbers match desired version (see package releases).
Before benchmarks (pre-processing)
In the data-images folder we provide some sample images with landmarks for registration.
These sample registration pairs are saved in data-images/pairs-imgs-lnds_mix.csv.
You can create your own costume cover table for a given dataset (folder with images and landmarks) by hand or use script bm_dataset/create_registration_pairs.py assuming the same folder structure <dataset>/<image-set>/<scale>/<images-and-landmarks> as for the CIMA dataset.
Prepare synthetic data
There is a script to generate synthetic data. Just set an initial image and their corresponding landmarks. The script will generate a set of geometrically deformed images mimicking different stains and compute the new related landmarks.
python bm_dataset/create_real_synth_dataset.py \
    -i ./data-images/images/Rat_Kidney_HE.jpg \
    -l ./data-images/landmarks/Rat_Kidney_HE.csv \
    -o ./output/synth_dataset \
    -nb 5 --nb_workers 3 --visual
Creating an image-pairs table
When the synthetic datasets have been created, the cover csv file which contains the registration pairs (Reference and Moving image (landmarks)) is generated. Two modes are created: “first2all” for registering the first image to all others and “each2all” for registering each image to all other. (note A-B is the same as B-A)
python bm_dataset/generate_regist_pairs.py \
    -i ./data-images/synth_dataset/*.jpg \
    -l ./data-images/synth_dataset/*.csv \
    -csv ./data-images/cover_synth-dataset.csv \
    --mode each2all
Customize the images and landmarks
We offer a script for scaling images in to particular scales for example
python bm_dataset/rescale_tissue_images.py \
    -i "./data-images/rat-kidney_/scale-5pc/*.jpg" \
    -scales 10 -ext .png --nb_workers 2
We introduce an option how to randomly take only a subset (use nb_selected) of annotated landmarks and also add some synthetic point (filling points up to nb_total) which are across set aligned using estimate affine transformation.
python bm_dataset/rescale_tissue_landmarks.py \
    -a ./data-images -d ./output \
    --nb_selected 0.5 --nb_total 200
Moreover we developed two additional script for converting large images, handling multiple tissue samples in single image and crop to wide background.
bm_dataset/convert_tiff2png.pyconverts TIFF or SVS image to PNG in a particular levelbm_dataset/split_images_two_tissues.pysplits two tissue samples with clear wide bound in vertical or horizontal directionbm_dataset/crop_tissue_images.pycrops the tissue sample removing wide homogeneous background
Experiments with included methods
Even though this framework is completely customizable we include several image registration methods commonly used in medical imaging.

Install methods and run benchmarks
For each registration method, different experiments can be performed independently using different values of the parameters or image pairs sets.
Sample execution of the “empty” benchmark template:
python birl/bm_template.py \
    -t ./data-images/pairs-imgs-lnds_mix.csv \
    -o ./results \
    -cfg sample_config.yaml \
    --preprocessing matching-rgb gray \
    --unique --visual
or with relative paths:
python birl/bm_template.py \
    -t ./data-images/pairs-imgs-lnds_histol.csv \
    -d ./data-images \
    -o ./results \
    -cfg sample_config.yaml \
    --preprocessing gray matching-rgb
The general Image Registration benchmarks contain couple required and optional parameters which are shared among ‘all’ methods/benchmarks. The brief description is following…
Required parameters:
-t/--path_tablepath to the cover table describing image/landmarks registration pairs-d/--path_datasetpath to the dataset folder with images and landmarks-o/--path_outoutput path for saving results
Optional parameters:
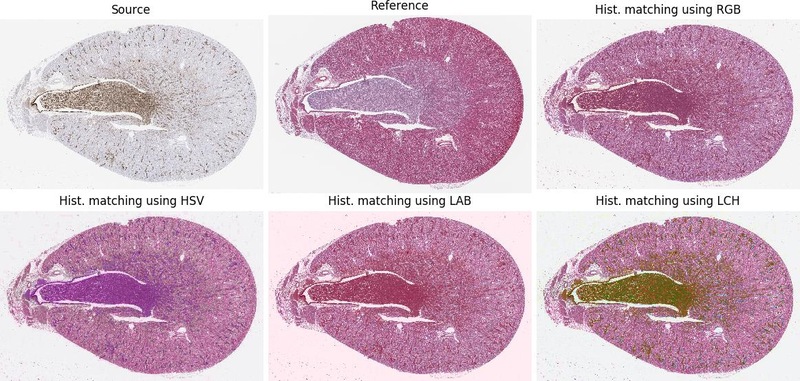
--preprocessingoffer some image pre-processing before image registration starts, the order defines order of performed operations; the options arematching-<color-space>(where<color-space>is for examplergborhsv) equalise source to target image andgrayconverting both images to gray-scale--uniqueeach experiment has creation stamp included in its name (prevent overwriting experiments with the same method)--visualgenerate a simple visualisation of particular image registrations

Measure your computer performance using average execution time on several simple image registrations. The registration consists of loading images, denoising, feature detection, transform estimation and image warping.
python bm_experiments/bm_comp_perform.py -o ./results
This script generate simple report exported in JSON file on given output path.
Prepared experimental docker image
Used prepared docker image from Docker Hub
docker run --rm -it borda/birl:SOTA-py3.7 bash
You can build it on your own, note it takes lots of time, be prepared.
git clone <git-repository>
docker image build \
    -t birl:py3.8 \
    -f bm_experiments/Dockerfile \
    --build-arg PYTHON_VERSION=3.8 \
    .
To run your docker use
docker image list
docker run --rm -it birl:py3.6 bash
Included registration methods
For each benchmark experiment, the explanation about how to install and use a particular registration method is given in the documentation. Brief text at the top of each file.
- bUnwarpJ is the ImageJ plugin for elastic registration (optional usage of histogram matching and integration with Feature Extraction).
python bm_experiments/bm_bUnwarpJ.py \ -t ./data-images/pairs-imgs-lnds_histol.csv \ -d ./data-images \ -o ./results \ -Fiji ~/Applications/Fiji.app/ImageJ-linux64 \ -cfg ./configs/ImageJ_bUnwarpJ_histol.yaml \ --preprocessing matching-rgb \ --visual --unique - Register Virtual Stack Slices (RVSS) is the ImageJ plugin for affine/elastic registration of a sequence of images.
python bm_experiments/bm_RVSS.py \ -t ./data-images/pairs-imgs-lnds_histol.csv \ -d ./data-images \ -o ./results \ -Fiji ~/Applications/Fiji.app/ImageJ-linux64 \ -cfg ./configs/ImageJ_RVSS_histol.yaml \ --visual --unique - elastix is image registration toolkit based on ITK and it consists of a collection of algorithms that are commonly used to solve (medical) image registration problems. For more details see documentation.
python bm_experiments/bm_elastix.py \ -t ./data-images/pairs-imgs-lnds_histol.csv \ -d ./data-images \ -o ./results \ -elastix ~/Applications/elastix/bin \ -cfg ./configs/elastix_affine.txt \ --visual --unique - rNiftyReg is an R-native interface to the NiftyReg image registration library which contains programs to perform rigid, affine and non-linear registration of Nifty or analyse images. NiftyReg supports max image size 2048.
python bm_experiments/bm_rNiftyReg.py \ -t ./data-images/pairs-imgs-lnds_histol.csv \ -d ./data-images \ -o ./results \ -R Rscript \ -script ./scripts/Rscript/RNiftyReg_linear.r \ --visual --unique - Advanced Normalization Tools (ANTs) is a medical imaging framework containing state-of-the-art medical image registration and segmentation methods.
python bm_experiments/bm_ANTs.py \
    -t ./data-images/pairs-imgs-lnds_anhir.csv \
    -d ./data-images \
    -o ./results \
    -ANTs ~/Applications/antsbin/bin \
    -cfg ./configs/ANTs_SyN.txt
For illustration see ANTsPy registration tutorial.
python bm_experiments/bm_ANTsPy.py \ -t ./data-images/pairs-imgs-lnds_histol.csv \ -d ./data-images \ -o ./results \ -py python3 \ -script ./scripts/Python/run_ANTsPy.py \ --visual --unique - DROP is image registration and motion estimation based on Markov Random Fields.
python bm_experiments/bm_DROP2.py \ -t ./data-images/pairs-imgs-lnds_histol.csv \ -d ./data-images \ -o ./results \ -DROP ~/Applications/DROP2/dropreg \ -cfg ./configs/DROP2.txt \ --visual --unique - …
Some more image registration methods integrated in ImageJ are listed in Registration.
Add custom registration method
The only limitation of adding costume image registration methods that it has to be launched from python script or command line. The new registration benchmark should be inherited from ImRegBenchmark as for example BmTemplate.
The benchmark workflow is the following:
self._prepare()prepare the experiment, e.g. create experiment folder, copy configurations, etc.self._load_data()the load required data - the experiment cover fileself._run()perform the sequence of experiments (optionally in parallel) and save experimental results (registration outputs and partial statistic) to common table and optionally do particular visualisation of performed experimentsself._evaluate()evaluate results of all performed experimentsself._summarise()summarize and export results from complete benchmark.
General methods that should be overwritten:
_check_required_params(...)verify that all required input parameters are given [on the beginning of benchmark]_prepare_img_registration(...)if some extra preparation before running own image registrations are needed [before each image registration experiment]_execute_img_registrationexecute/perform the image registration, time of this methods is measured as execution time. In case you call external method from command line, just rewrite_generate_regist_command(...)which prepare the registration command to be executed, also you can add generating complete registration script/macro if needed; [core of each image registration experiment]_extract_warped_image_landmarks(...)extract the required warped landmarks or perform landmark warping in this stage if it was not already part of the image registration [after each image registration experiment]_extract_execution_time(...)optionally extract the execution time from the external script [after each image registration experiment]_clear_after_registration(...)removing some temporary files generated during image registration [after each image registration experiment]
The new image registration methods should be added to bm_experiments folder.
Re-evaluate experiment
In case you need to re-compute evaluation or add visualisation to existing experiment you can use the following script.
The script require complete experiment folder with standard registration-results.scv (similar to registration pairs extended by experiment results).
python bm_experiments/evaluate_experiment.py \
    -e ./results/BmUnwarpJ \
    --visual
License
The project is using the standard BSD license.
References
For complete references see bibtex.
- Borovec, J., Munoz-Barrutia, A., & Kybic, J. (2018). Benchmarking of image registration methods for differently stained histological slides. In IEEE International Conference on Image Processing (ICIP) (pp. 3368–3372), Athens. DOI: 10.1109/ICIP.2018.8451040
- Borovec, J. (2019). BIRL: Benchmark on Image Registration methods with Landmark validation. arXiv preprint arXiv:1912.13452.
- Borovec, J., Kybic, J., et al. (2020). ANHIR: Automatic Non-rigid Histological Image Registration Challenge. In IEEE Transaction on Medical Imaging (TMI). DOI: 10.1109/TMI.2020.2986331.
Appendix - Useful information
Configure local environment
Create your own local environment, for more information see the User Guide, and install dependencies requirements.txt contains a list of packages and can be installed as
@duda:~$ cd BIRL
@duda:~/BIRL$ virtualenv env
@duda:~/BIRL$ source env/bin/activate
(env)@duda:~/BIRL$ pip install -r requirements.txt
(env)@duda:~/BIRL$ python ...
and in the end, terminating…
(env)@duda:~$ deactivate
Running docString tests - documentation and samples of doc string on pymotw and python/docs
Listing dataset in command line
find . | sed -e "s/[^-][^\/]*\// |/g" -e "s/|\([^ ]\)/|-\1/" >> dataset.txt

